¶ Overview
This guide provides information for VM deployment for EDGE Manager, ZTNA Broker, and Cloud-based Router.
See here to bring your own Linux OS for EDGE Manager.
¶ Minimum requirements
¶ EDGE Manager
- 4-cores
- 16GiB RAM
- 64GB root/data disk
- Preferably SSD (spinning rust is fine for lab, but expect performance issues)
- Fixed, routable IP address, either:
- Public WAN IP address NATed to LAN IP of EM
- Public WAN IP address directly on interface of EM
- Private APNs: LAN IP address of EM
¶ ZTNA-Broker
- 4-cores
- 16GiB RAM
- 64GB root/data disk
- Must not be in same LAN subnet as EDGE Manager nor any CBR/CPE.
¶ Cloud-based Router
- 2-cores
- 0.5 GiB RAM
- 1GB root disk
- Fixed, routable IP address, either:
- Public WAN IP address NATed to private WAN IP of CBR
- Public WAN IP address directly on WAN interface of CBR
- Private APNs: private WAN IP of CBR
- Must not be in same LAN subnet as EDGE Manager nor ZTNA-B. Being in the same WAN subnet as another CBR/CPE is okay, but mind any public IP address mappings. If two CBRs are in 10.123.0.0/24 and reachable then they can form tunnels between their 10.123.0.0/24 addresses directly instead of to their mapped public addresses.
NOTE: In most deployments, production dataflow is not impacted if EDGE Manager is offline. However, without EDGE Manager, you lose management, visibility, and alerting. EDGE Manager and ZTNA Broker are required to be online for Enterprise/RADIUS functionality. Deploy CPE in HA configurations where required.
Upgrade SSD tier or add more cores or RAM as needed.
Backup the VM and/or database as per your organization's DR/BCP policies.
¶ Hypervisor agnostic
EDGE Manager OVA is built on an x86-64 Debian, BIOS/MBR-boot (Generation 1) install with Docker & images pre-loaded. The OS can run on most systems. Feel free to convert the provided VMDK or Open Virtual Appliance (OVA) to your needed format.
https://docs.openstack.org/image-guide/convert-images.html
https://cloudbase.it/qemu-img-windows/
If you want a GUI:
NOTE: Inseego does not officially endorse this product.
https://www.starwindsoftware.com/v2v-help/CovertingtoVHDVHDX.html
https://www.starwindsoftware.com/v2v-help/ConvertingtoMicrosoftAzure.html
https://www.starwindsoftware.com/v2v-help/ConverttoQCOW2.html
¶ Obtaining OVA/VMDK
Contact your sales representative to obtain the AWS keys.
You'll need: AWS CLI then do aws configure
Pull the OVA/VMDK from the S3 bucket. e.g.:
- EM OVA:
aws s3api get-object --bucket exportimage-aws --key "exports/EM_2023.9.1.0.ova" EM_2023.9.1.0.ova - CBR VMDK:
aws s3api get-object --bucket exportimage-aws --key CBR_2023.9.1.0.vmdk CBR_2023.9.1.0.vmdk
The EM image is the base OS with a specific version pre-staged for deployment. See Upgrade to change the version.
¶ VMware ESXi
To deploy to VMware ESXi, follow these steps:
- Open ESXi and click Create/Register VM to launch the creation wizard.
- Select Deploy a virtual machine from an OVF or OVA file as the creation type and click Next.
- Enter a name for the virtual machine and select or drag and drop the OVF and VMDK files. Click Next.
- Select an appropriate datastore and click Next.
- Place VM NIC into appropriate VM Network per your planning worksheet and organization’s security policies. Generally, a DMZ is sufficient.
NOTE: You may need to open ports to allow communications to DNS and internal AD servers for authentication functions. - For disk provisioning, you can choose either thick or thin disks. Click Next.
- Review your settings and click Finish to deploy VM.
vSphere steps are analogous.
See KB1028042 for manual VMDK imports if you have an older ESXi install, such as 6.5.vmkfstools -i "/vmfs/volumes/Datastore/examplevm/examplevm.vmdk" "/vmfs/volumes/Datastore 2/newexamplevm/newexamplevm.vmdk" -d thin
Manual VM creation types: EM/ZTNA-B - Ubuntu 64-bit; CBR Linux other
¶ Linux KVM
There are plenty of methods to create & manage VMs in KVM. Here are two common ways.
¶ virt-manager
The Linux KVM virt-manager utility allows users to create virtual machines using a GUI.
To deploy to KVM, follow these steps:
On the terminal, run the command: virt-manager
The virtual machine manager window appears.
Click the monitor icon to start creating a virtual machine.
Specify the location of your qcow2 image. In our case, the qcow2 image is located in the ‘Downloads’ folder in the home directory, so we select the fourth option Import existing disk Image. Click Forward.
Choose the operating system you are installing as Generic default. Click Forward.
Configure as per the recommended settings. Click Forward.
Enter EdgeManager in the Name field and select the Customize configuration before install checkbox. Click Finish.
Select NIC in the left panel and configure - for example:
Network source: Host device enp5s0:mactap
Source mode: Bridge
Click Apply.
Click Begin Installation in the upper left.
¶ Cockpit-Machines
Access Machines e.g. https://yourKVMhost:9090/machines
Obtain the cloud base image manually:
cd /var/lib/libvirt/images
wget https://cloud-images.ubuntu.com/releases/jammy/release/ubuntu-22.04-server-cloudimg-amd64-disk-kvm.img
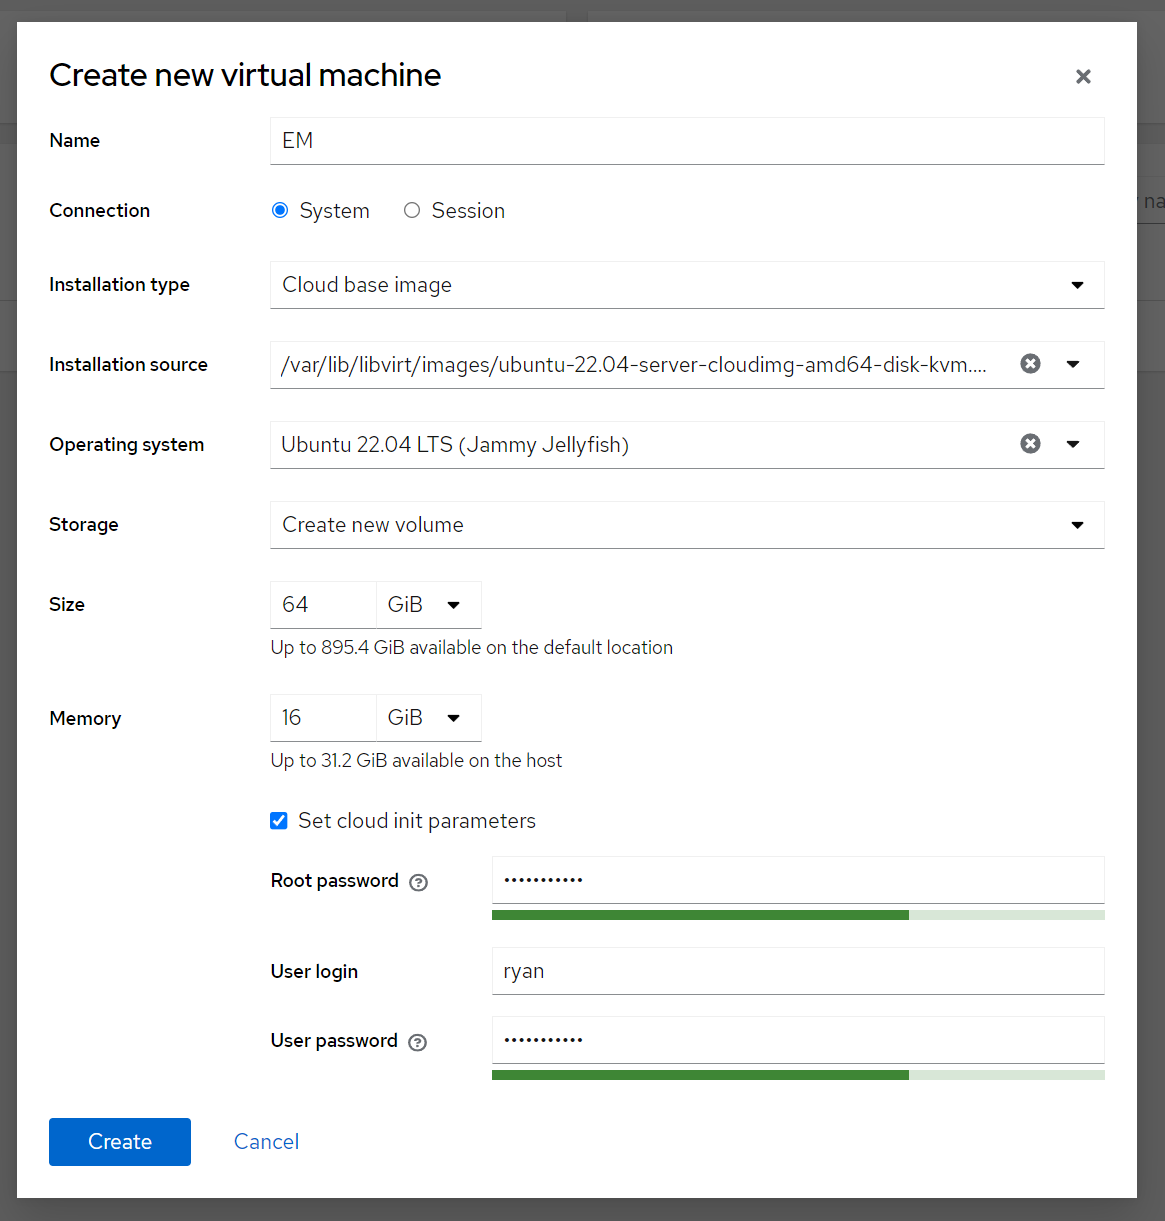
Create the VM.

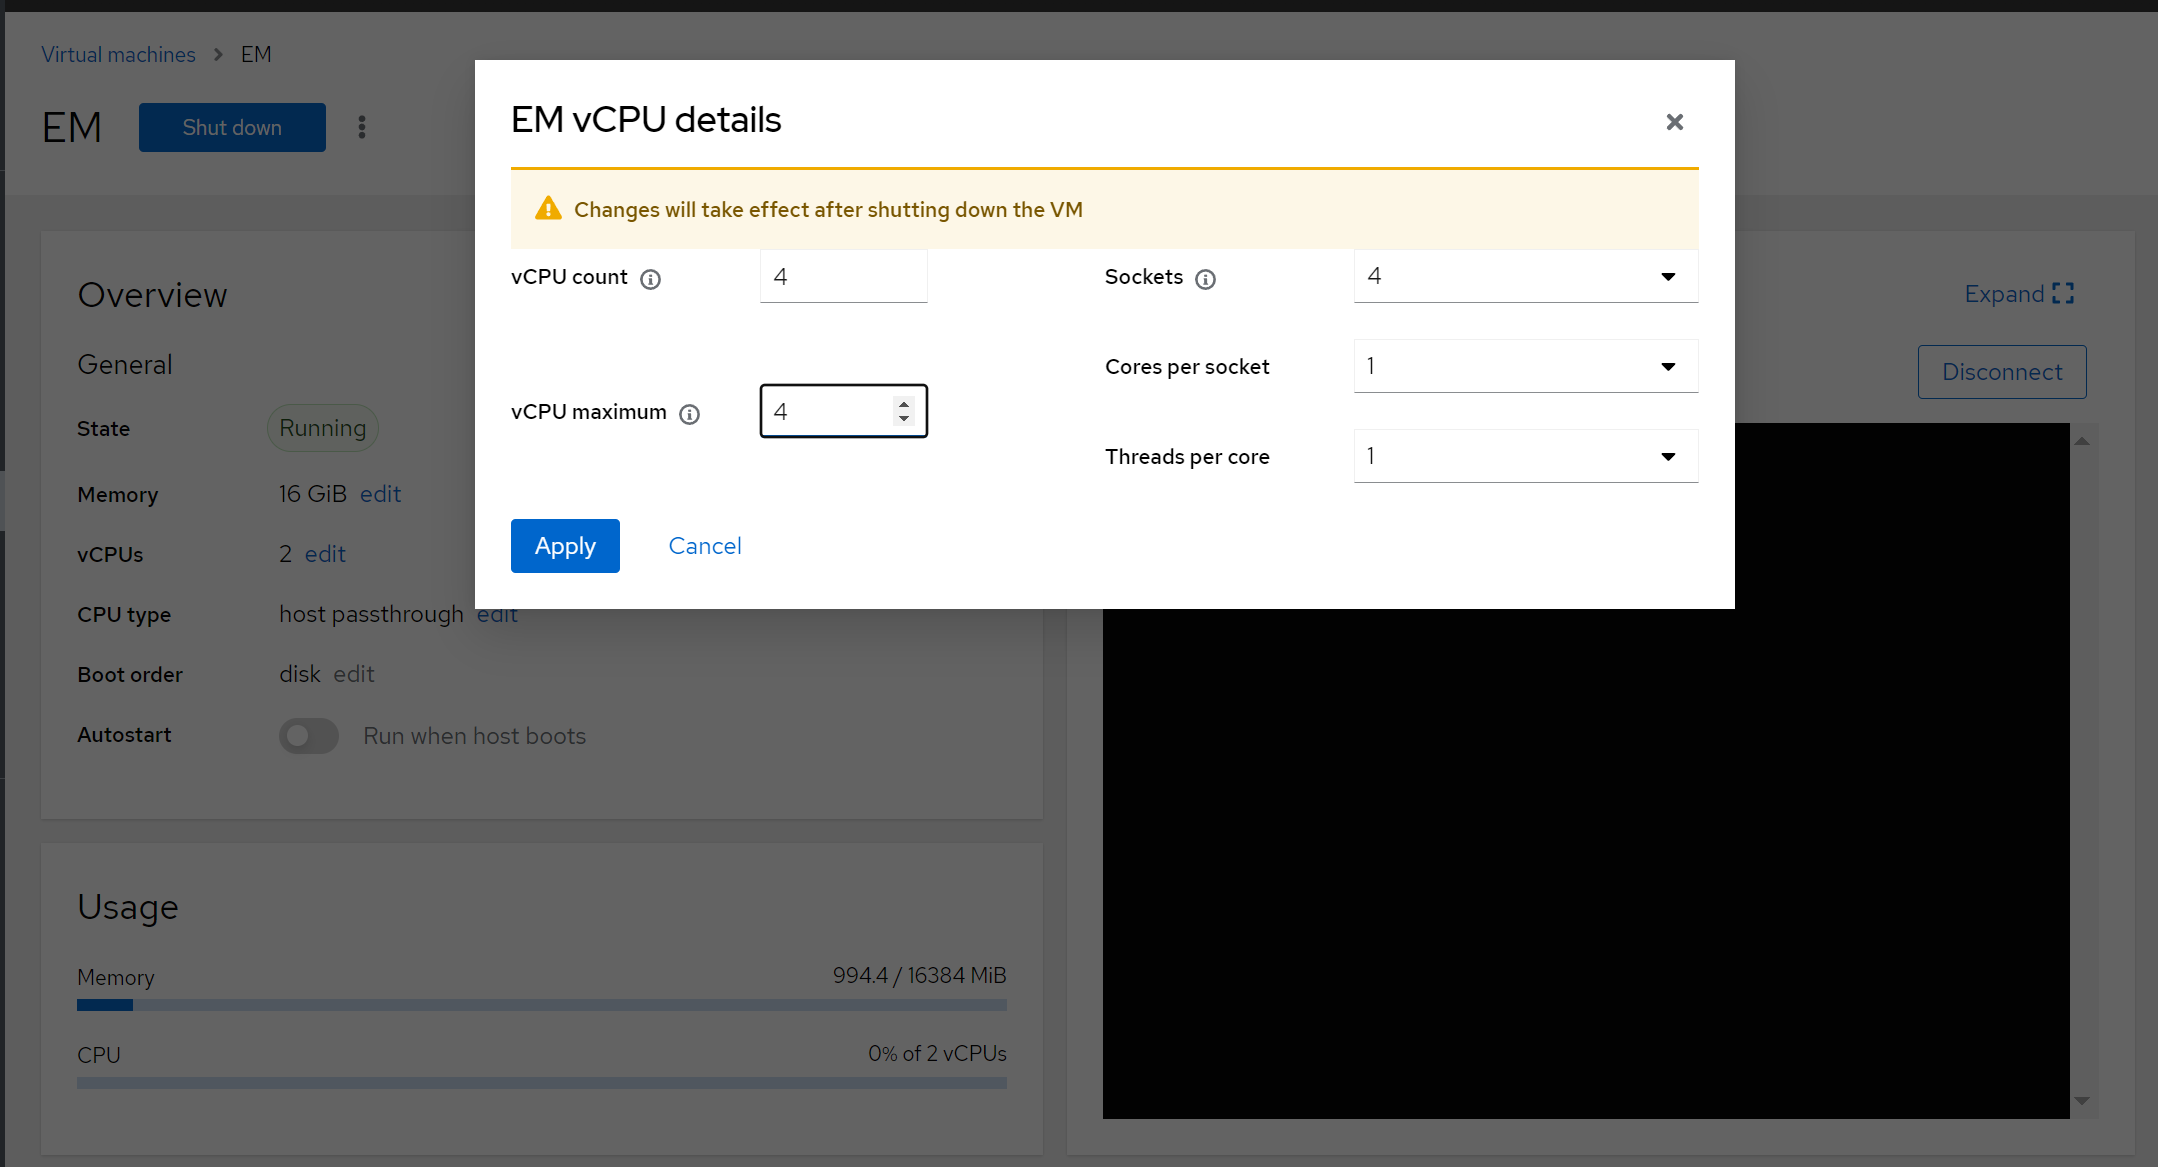
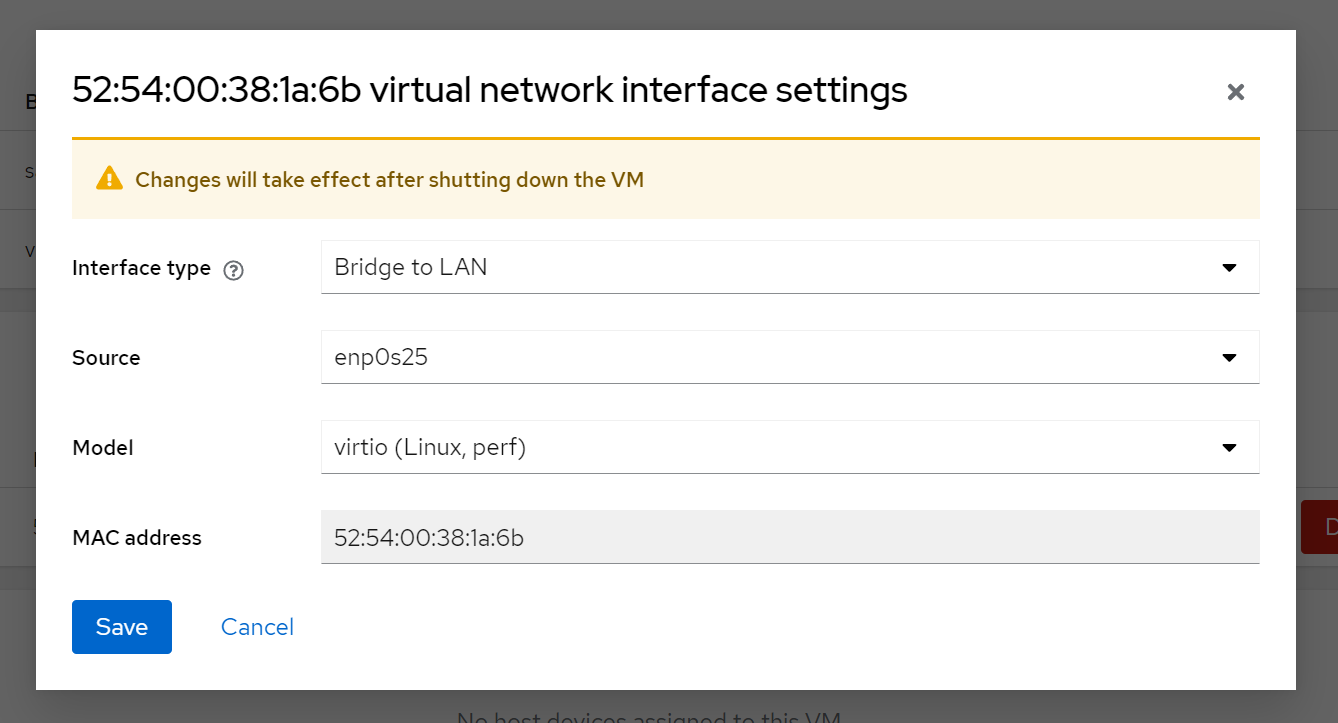
Adjust cores & networking as per planning.


Obtain the VM's IP address via virsh or (serial) console
virsh domifaddr EM
Name       MAC address          Protocol     Address
-------------------------------------------------------------------------------
vnet0 52:54:00:38:1a:6b ipv4 192.168.100.112/24¶ Microsoft Hyper-V
To deploy to Hyper-V, follow these steps:
- Convert VMDK to VHDX. NOTE: You can use thick or full.
- Create a Generation 1 VM or attach to an existing VM with the VHDX as boot disk.
¶ Microsoft Azure
Use Terraform or portal.azure.com
¶ Manual VHD load
To deploy to Azure, follow these steps:
Convert VMDK to an Azure-compatible VHD.qemu-img.exe convert CBR_2022.20.1.0.vmdk -O vpc -o subformat=fixed -o force_size CBR_2022.20.1.0.vhd
Upload VHD to a storage account (blob).
Create a Linux OS disk based on the VHD in the storage account.
Create a VM with the disk or swap the OS disk to this disk.
Note: When simply deployed in this fashion, any traffic routed to Azure through a CBR must be masqueraded as the CBR's WAN interface address. Azure will drop all packets otherwise sourced. Route Server is required for full end-to-end routing. https://azure.microsoft.com/en-us/products/route-server
¶ Amazon Web Services (AWS)
For CBR, contact your partner or sales representative to provide your AWS account number in order obtain access to the CBR AMI.
For EDGE Manager or ZTNA-B, you may use OVA or an AMI.
¶ Upload OVA to the AWS S3 bucket
To bring up EDGE Manager or ZTNA-B using the OVA file on AWS, first upload OVA to the AWS S3 bucket and then launch the EDGE Manager server.
Login to AWS console and go to S3 service. Select Buckets from the left panel, click Upload, and upload OVA to the S3 bucket.
Login to AWS console again (NOTE: You must use your credentials). Go to IAM service and select Users from the left panel, then click the Security credentials tab and create access keys.
NOTE: Make sure to keep your access keys in a secure location.
Install AWS CLI installation on your server using the following command:curl "https://awscli.amazonaws.com/awscli-exe-linux-x86_64.zip" -o "awscliv2.zip"sudo apt-get install unzipunzip awscliv2.zipsudo ./aws/install
Check the AWS CLI version using:aws --version
Configure AWS CLI by running the command: aws configure and enter the AWS access credentials as inputs:
For example:
Access key id - XXXXXXXXXXXXXXXXXXX
Secret Access key - **************************
Default region name - <your primary region>
Default output format - leave blank (press enter)
Without root login, create Trust-Policy.json, role-policy, Container.json.
Create a role.
Use the create-role command to create a role named vmimport and grant VM Import/Export access to it. Ensure that you specify the full path to the location of the trust- policy.json file that you created in the previous step, and that you include the file:// prefix as shown the following example:
trust-policy.json
{"Version":"2012-10-17","Statement":[{"Effect":"Allow","Principal":{"Service":"vmie.amazonaws.com"},"Action":"sts:AssumeRole","Condition":{"StringEquals":{"sts:Externalid":"vmimport"}}}]}role-policy.json
{
  "Version": "2012-10-17",
  "Statement": [
    {
      "Effect": "Allow",
      "Action": [
        "s3:GetBucketLocation",
        "s3:GetObject",
        "s3:ListBucket"
      ],
      "Resource": [
        "arn:aws:s3:::RENAMEME",
        "arn:aws:s3:::RENAMEME/*"
      ]
    },
    {
      "Effect": "Allow",
      "Action": [
        "s3:GetBucketLocation",
        "s3:GetObject",
        "s3:ListBucket",
        "s3:PutObject",
        "s3:GetBucketAcl"
      ],
      "Resource": [
        "arn:aws:s3:::RENAMEMEt",
        "arn:aws:s3:::RENAMEME/*"
      ]
    },
    {
      "Effect": "Allow",
      "Action": [
        "ec2:ModifySnapshotAttribute",
        "ec2:CopySnapshot",
        "ec2:RegisterImage",
        "ec2:Describe*"
      ],
      "Resource": "*"
    },
    {
      "Effect": "Allow",
      "Action": [
        "kms:CreateGrant",
        "kms:Decrypt",
        "kms:DescribeKey",
        "kms:Encrypt",
        "kms:GenerateDataKey*",
        "kms:ReEncrypt*"
      ],
      "Resource": "*"
    },
    {
      "Effect": "Allow",
      "Action": [
        "license-manager:GetLicenseConfiguration",
        "license-manager:UpdateLicenseSpecificationsForResource",
        "license-manager:ListLicenseSpecificationsForResource"
      ],
      "Resource": "*"
    }
  ]
}containers.json
[{"Description":"MyserverVM","Format":"ova","UserBucket":{"S3Bucket":"importdemolongship","S3Key":"EM-2022.11.1.1.ova"}}]On Ubuntu Bash:
aws iam create-role --role-name vmimport --assume-role-policy-document "file://trust-policy.json"
aws iam put-role-policy --role-name vmimport --policy-name vmimport --policy-document file://role-policy.json
Copy the S3 bucket key in the container.json file from the S3 bucket:
Login to AWS console.
Go to S3 bucket and select your bucket.
Copy the key and update the same in the container.json file
Create the AMI of the existing OVA file using the command:aws ec2 import-image --description "My server VM" --disk-containers "file://containers.json
Check the status of the snapshot using the command:
aws ec2 describe-import-image-tasks --import-task-ids import-ami-<ami-id>
<ImportTaskId>: Find from the previous command output.
Check that the AMI has been created in the AWS console:
Login to the AWS console.
Go to EC2 service and click AMI.
NOTE: Make sure your region is correctly selected from top right menu.
You should see that the New AMI has been created using the OVA.
¶ Launch the virtual machine
Login to AWS console, go to EC2 service > AMI, and select the AMI image. Click Launch.
Choose an instance and click Next.
Select a VPC from the Network drop-down and enable Auto-assign Public IP. Click Next.
Add the appropriate storage.
In the Add Tags section, enter the name of the server and click Next.
Select an existing security group or create a new one.
If you are creating a new security group:
For SSH – You can edit the source IP address as desired. NOTE: If you want to allow access to the portal from outside the domain, configure the IP address as 0.0.0.0/0. This allows the portal to open from browsers on laptops/desktops anywhere. If you want to restrict access, provide a specific IP.
For Inbound rule – Update rules for the following ports and services:
Click Review and Launch.
Review the instance and click Launch.
Create a new PEM file. Select Create a new key pair, enter a name, and click Download Key Pair. NOTE: Make of note of this key pair (PEM) file.
Click on View Instances. You can click on the instance ID to view more information.